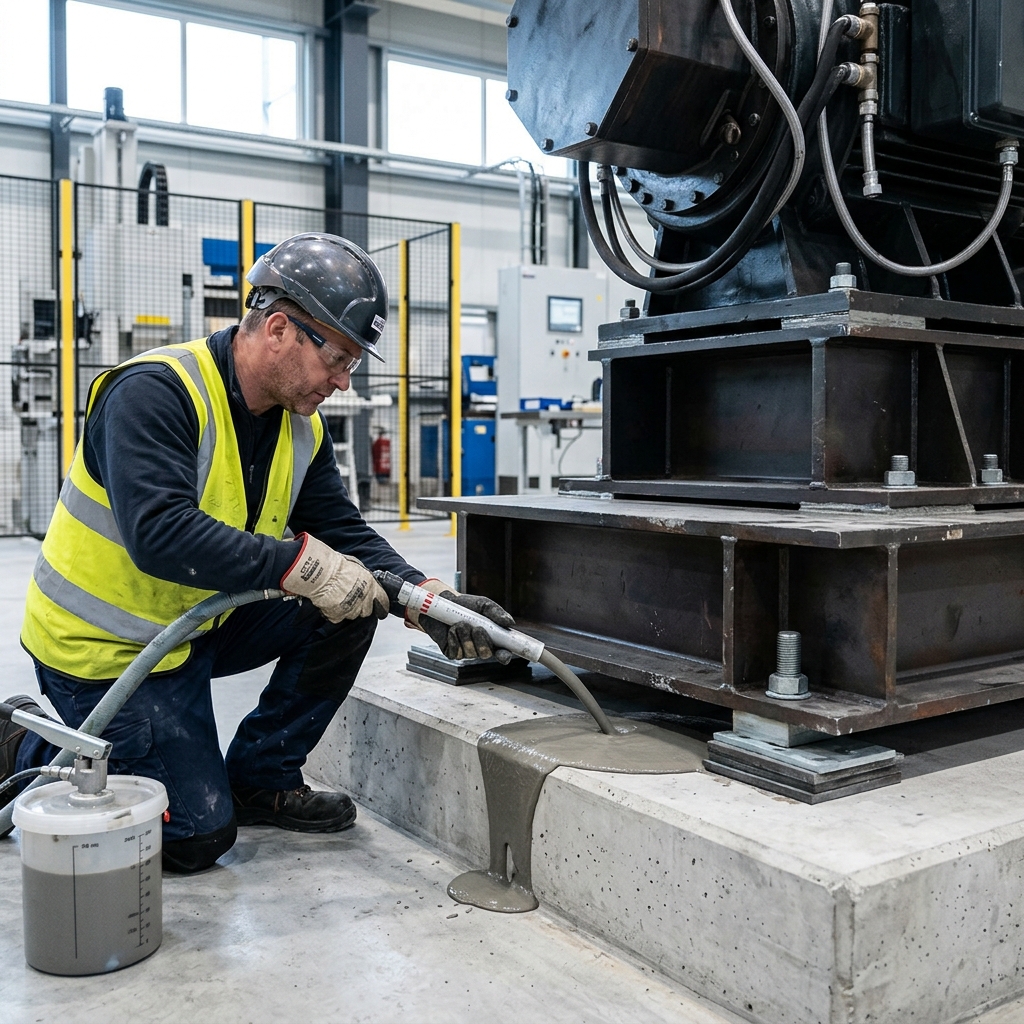
Anchor grouting is one of those specialised tasks that looks simple but requires real expertise to get right. The goal is to fill the gap between a machine baseplate and its concrete foundation with a high-strength, non-shrink grout that transfers dynamic and static loads uniformly from the equipment into the foundation. A poorly executed anchor grouting job leads to misalignment, vibration, machine downtime, and in extreme cases, foundation failure. I have witnessed a 5 MW compressor skid that had to be lifted and re-grouted three months after installation because the cementitious grout had shrunk and cracked under the baseplate. The production loss alone was over a crore of rupees.
What Is Anchor Grouting?
Anchor grouting involves pouring a fluid, high-strength grout into the space between a machine baseplate and the prepared concrete foundation. The grout must flow into every corner of the gap — often only 25–75 mm deep — and bond securely to both the concrete and the steel plate. It must also be non-shrink, because any shrinkage creates a gap that prevents proper load transfer and allows vibration to develop.
Anchor grouts are either cementitious (Portland cement-based with shrinkage-compensating additives) or epoxy-based (100% solids, thermosetting resin systems). Each has its place, and choosing between them depends on the application, gap thickness, ambient temperature, and required cure time before the machine can be commissioned.
Cementitious vs Epoxy Anchor Grouts
Cementitious anchor grouts are the traditional choice. They are mixed with water, develop compressive strength of 50–80 MPa at 28 days, and are relatively economical. Modern cementitious grouts contain shrinkage-compensating agents — typically a combination of expansive calcium sulfoaluminate and gas-generating aluminium powder — that cause the grout to expand slightly during early hydration, offsetting the drying shrinkage that follows.
Epoxy anchor grouts offer superior performance in demanding conditions. They achieve compressive strength of 80–120 MPa, develop 70% of their ultimate strength within 24 hours, and have excellent bond strength to both steel and concrete — often exceeding the tensile strength of the concrete itself. Epoxy grouts are also resistant to oils, chemicals, and vibration. I recommend epoxy grouting for turbine generators, large compressors, rolling mills, and any machinery with high dynamic loads or where early commissioning is critical.
The downside of epoxy is cost — typically 3–5 times more than cementitious grout — and sensitivity to temperature. Below 15°C, epoxy cures slowly and may not achieve full properties. Above 35°C, the working life becomes very short — sometimes as little as 10 minutes.
Baseplate and Foundation Preparation
Surface preparation is the difference between a grout that lasts 20 years and one that fails in 2 years. The concrete foundation surface must be clean, sound, and free of oil, grease, laitance, and curing compound. Chip or scabble the surface to expose coarse aggregate and provide a mechanical key. The baseplate should be clean and free of rust, oil, and paint. Some specifications require a minimum anchor bolt tension before grouting to ensure the baseplate is seated firmly.
Forms must be constructed around the baseplate to contain the grout, sealed tightly with caulk or foam rope to prevent leakage. A head box or header tank is placed at the form to provide hydraulic pressure that helps the grout flow under the plate. For large baseplates, multiple pour points may be needed — I seldom rely on a single pour point for any plate longer than 3 metres.
Mixing and Pouring Methods
Pour the grout continuously from one side of the baseplate, allowing it to flow under the plate and displace air ahead of it. Never pour from both sides — that traps air, creating voids. The flow front should be monitored with a flashlight to ensure grout is reaching all areas. For deep pours (over 100 mm), place the grout in layers and allow exothermic heat to dissipate between lifts. Epoxy grouts can generate significant heat during cure — a 100 mm thick pour can reach 80–90°C internally — which can cause thermal cracking if not managed.
Quality Control and Testing
Quality control starts before the pour. Sample the grout for flow (fluidity) using a flow cone per ASTM C230 or similar. The flow value should be within the manufacturer's specified range. During the pour, cast test cubes or cylinders for compressive strength testing at 1, 3, 7, and 28 days (for cementitious) or 1, 3, and 7 days (for epoxy). After curing, tap the baseplate with a hammer in a grid pattern. A ringing sound indicates a solid bond; a dull thud suggests a void underneath. For critical machinery, I always specify ultrasonic or impact-echo testing to detect voids with certainty.
One more thing: never, ever use a vibrator to consolidate grout. Vibration causes aggregate segregation and disrupts the shrinkage-compensating system in cementitious grouts. Use flow alone to fill the space.
How soon after grouting can I operate the machinery?
For epoxy grouts with rapid-cure formulations, light load is possible after 24 hours and full load after 48–72 hours. For cementitious grouts, allow 7 days for 70% strength and 28 days for full load. Check the manufacturer's recommendation — it depends on temperature and the specific formulation.
What causes anchor grout to crack?
Cracking is usually due to excessive shrinkage, improper mixing (too much water), or thermal stresses during cure. Epoxy grouts can crack from exothermic heat in thick sections. Cementitious grouts crack from drying shrinkage if the shrinkage compensation is inadequate or the grout is not properly cured.
Can I drill through anchor grout for dowels?
Yes, after the grout has fully cured. For cementitious grout, wait 28 days. For epoxy, wait 7 days. Use a hammer drill with a vacuum attachment to keep the hole dust-free, and fill with epoxy anchoring adhesive.