If you have ever dealt with a leaking bathroom that damaged the ceiling of the room below, you already know why bathroom waterproofing is not something you cut corners on. In Indian homes, bathrooms see heavy usage — multiple showers a day, buckets of water splashed around, and constant moisture exposure. Without proper waterproofing, water finds its way through the floor and walls, leading to plaster peeling, tile loosening, seepage in adjacent rooms, and even structural damage over time.
The good news is that bathroom waterproofing is not complicated if you follow the right method. The bad news is that a lot of contractors in India skip critical steps or use cheap materials to save money, and the problems show up six months down the line. This guide walks you through the complete process — step by step — so you know exactly what needs to be done and can hold your contractor accountable.
Why Bathroom Waterproofing Fails in Most Indian Homes
Before we get into the process, it is worth understanding why most bathroom waterproofing fails. The number one reason is poor surface preparation. Waterproofing compounds need a clean, dust-free, properly cured surface to bond with. If the plaster is green or the floor has loose particles, the coating will not stick and will delaminate within months.
The second reason is skipped detailing at corners and pipe penetrations. Water always finds the path of least resistance, and that path is usually the junction between the floor and wall or the gap around a drain pipe. If these areas are not reinforced with additional waterproofing layers or waterproofing tape, expect leaks.
The third reason is using the wrong type of waterproofing material. Many local plumbers still rely on brickbat waterproofing — a traditional method where brick pieces are laid over the slab and coated. This adds dead load and is less reliable than modern polymer-modified cementitious or liquid membrane systems.
Materials You Will Need for Bathroom Waterproofing
For a standard Indian bathroom waterproofing job, here is what you typically need. Cementitious waterproofing coating — a two-component polymer-modified cementitious system is the gold standard for bathroom floors and walls. It bonds well with concrete and forms a rigid, waterproof layer. Liquid polyurethane membranes are another option for seamless application, especially on complex shapes. Waterproofing tape or fabric is used to reinforce corners, joints, and pipe penetrations. You will also need a primer to prepare the surface, cement and sand for screeding, and tile adhesive for the final tiling layer.
At Sterling Technotrade, our Technoproof range includes cementitious waterproofing coatings, liquid membranes, and reinforcing tapes designed specifically for Indian bathroom applications. These products are formulated to perform under the high-moisture, high-traffic conditions typical in Indian homes.
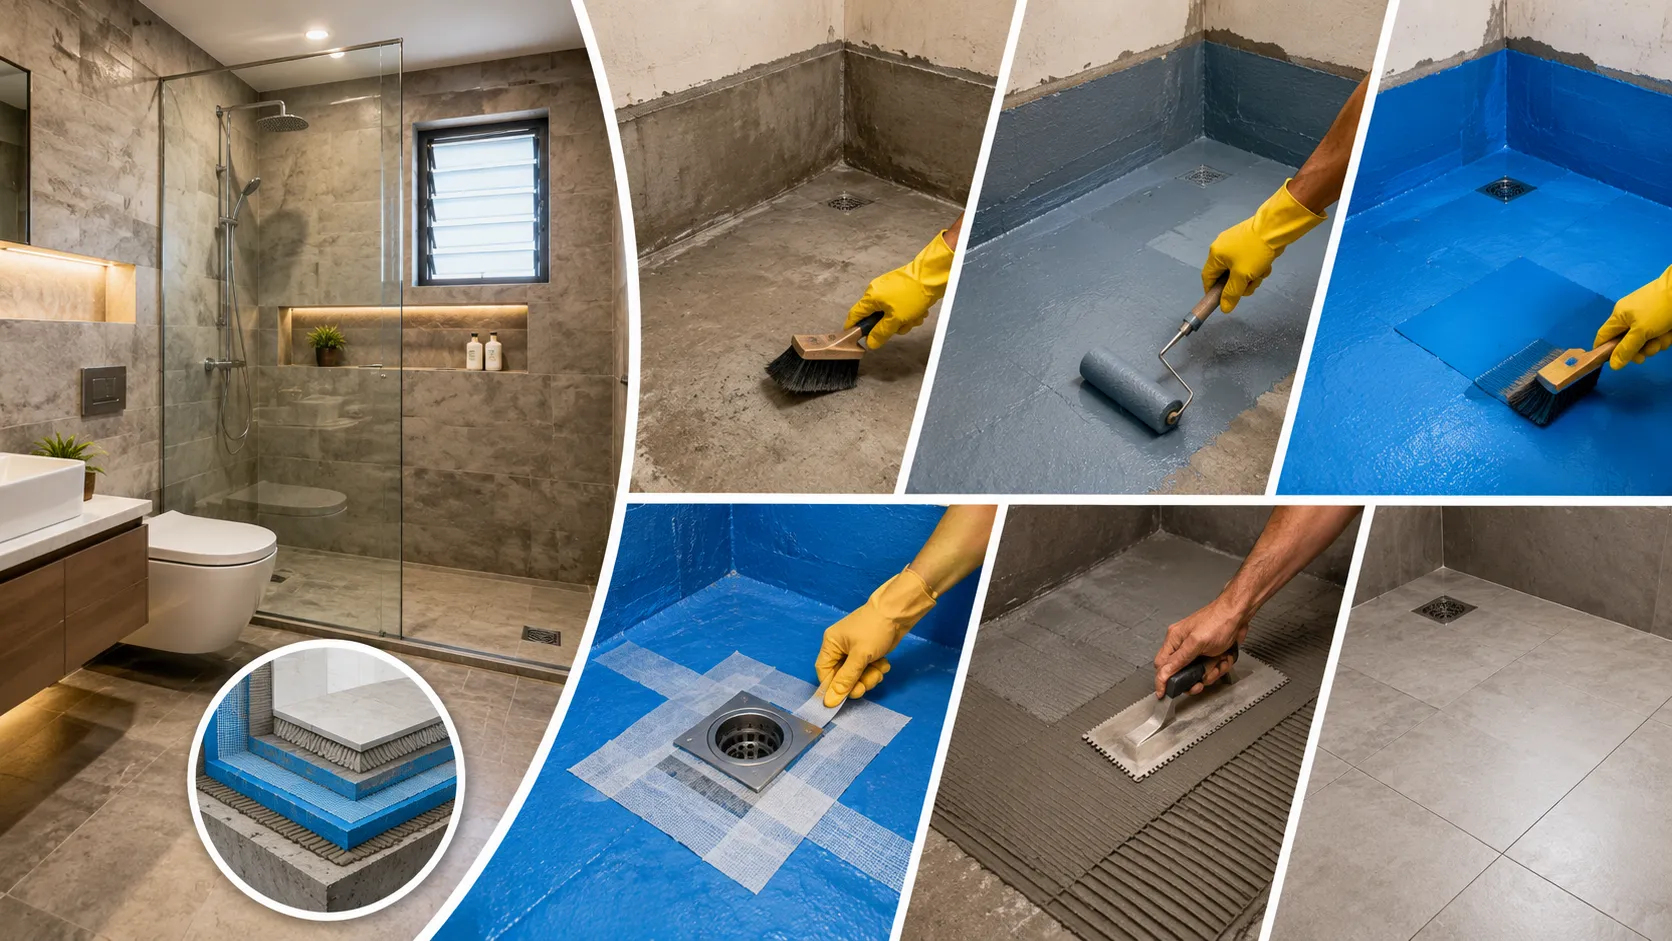
Step 1: Surface Preparation
This is the most critical step and the one most often rushed. The bathroom slab and walls must be fully cured — at least 7 days for a new slab. The surface needs to be clean, free of oil, grease, loose mortar, and dust. Use a wire brush to remove any loose particles, then wash the surface with water and let it dry slightly. The surface should be damp but not wet when you apply the waterproofing coating. If there are any cracks or honeycombing in the slab, repair them first with a quick-setting repair mortar.
All sharp edges and corners should be rounded with a chamfer or fillet. This prevents the waterproofing membrane from tearing at sharp 90-degree angles. A cement-sand fillet of about 25 mm radius at wall-floor junctions is standard practice.
Step 2: Priming
Apply a coat of primer over the entire surface that will be waterproofed. The primer improves adhesion of the waterproofing membrane to the substrate. Use a brush for corners and edges and a roller for large areas. Let the primer dry as per the manufacturer's instructions — typically 2 to 4 hours depending on temperature and humidity.
Step 3: Reinforcing Critical Areas
This is the step that separates good waterproofing from average work. Apply a thin coat of the waterproofing material at all wall-floor junctions, around drain pipes, at corners, and along any expansion joints. While it is still wet, embed waterproofing tape or reinforcing fabric into these areas. Press it firmly so it bonds completely with no air bubbles. The tape bridges these vulnerable areas and prevents cracks from transmitting through the membrane.
Pay special attention to the floor drain area. The waterproofing should extend into the drain flange by at least 50 mm. This is the most common leak point in Indian bathrooms — if water gets under the tile layer at the drain, it spreads everywhere.
Step 4: Applying the Waterproofing Membrane
Mix the waterproofing compound as per the manufacturer's instructions. For two-component cementitious systems, add the liquid component to the powder and mix with a slow-speed drill until you get a lump-free, creamy consistency. Apply the first coat using a brush or roller, working it well into the surface. Pay attention to even coverage — patchy areas will be weak points.
For bathrooms, the standard recommendation is to apply waterproofing on the floor slab and up the walls to a height of at least 300 mm. In wet areas like shower spaces, take it all the way up to 1.8 metres or ceiling height.
Let the first coat dry for 4 to 6 hours, then apply a second coat perpendicular to the first. The total dry film thickness should be around 1.5 to 2 mm for cementitious systems. For liquid polyurethane membranes, two coats with a total thickness of 1 to 1.5 mm is sufficient. Allow the final coat to cure for at least 24 to 48 hours before proceeding.
Step 5: Curing and Water Testing
After the waterproofing membrane has cured, fill the bathroom floor with about 50 mm of water and let it stand for 24 to 48 hours. Mark the water level and check if it drops. More importantly, go to the floor below and inspect the ceiling for any signs of dampness. This water test is non-negotiable — if there is a leak, you catch it now when fixing it is easy, not after tiling is done.
If you find leaks, identify the location, dry the area, and apply an additional coat of waterproofing over the affected spot. Repeat the water test until you are satisfied.
Step 6: Protection Layer and Tiling
Once the waterproofing passes the test, apply a protective screed — a thin layer of cement mortar about 20 to 30 mm thick — over the floor waterproofing. This protects the membrane from damage during tiling. Without this layer, workers walking on the membrane with tools and tiles can puncture it. On walls, you can tile directly over the cured waterproofing using a good quality tile adhesive like those from our Technofix range.
Use polymer-modified tile adhesive rather than traditional cement-sand mortar. It provides better bond strength and is less likely to crack. Grout the tiles with a waterproof grout to seal the joints.
Common Mistakes to Avoid
Do not apply waterproofing on a green or uncured slab — the chemicals in the slab can react with the coating and cause blistering. Do not apply the coating too thick in one coat; two thin coats are far more effective than one thick coat because thin coats cure properly without shrinkage cracking. Do not skip the protective screed — tiles directly on the membrane will eventually crack the waterproofing layer under foot traffic. And do not use brickbat waterproofing unless there is absolutely no alternative. It adds unnecessary weight and is far less reliable than modern systems.
Conclusion
Bathroom waterproofing is one area where doing it right the first time saves you a lot of money and headaches later. The process is straightforward — prepare the surface, prime it, reinforce the critical areas, apply the membrane in two coats, test for leaks, and protect the membrane before tiling. Follow these steps and your bathroom will stay dry for years. Cut corners and you will be breaking tiles to fix leaks within a year.
At Sterling Technotrade, we manufacture a complete range of bathroom waterproofing products under the Technoproof brand. If you need guidance on product selection or application, our technical team is available to help. Get in touch with us for a consultation.