A swimming pool is essentially a concrete box that holds hundreds of thousands of litres of water — under constant hydrostatic pressure, exposed to chemical treatment, and subject to thermal expansion and structural settlement. If the waterproofing fails, the results are devastating: water loss measured in thousands of litres per day, structural damage from eroded soil beneath the pool shell, and expensive tile repairs that often cost more than the original waterproofing. Yet many pool builders in India still treat waterproofing as an afterthought, slapping on a coat of cement slurry and hoping for the best.
This guide covers swimming pool waterproofing comprehensively: why pools leak, the various waterproofing systems available, a step-by-step installation process, tile fixing considerations, expansion joint detailing, water chemistry effects on waterproofing, and realistic cost figures for the Indian market. If you are building a new pool or repairing an existing one, the information here will help you specify a system that stays watertight for the long term.
Why Swimming Pools Leak
Pool leaks are rarely caused by a single dramatic failure. They develop gradually as the waterproofing system degrades under the combined assault of hydrostatic pressure, chemical exposure, and structural movement. The most common causes are:
Structural movement and cracking. A typical residential swimming pool in India is a reinforced concrete shell cast in situ. As the concrete cures, it shrinks. As the pool fills with water, the shell deflects under the weight. If the subgrade is not uniformly compacted, differential settlement introduces bending stresses that crack the concrete. Even hairline cracks — 0.1 mm wide — can leak significant water under the pressure of 1.5 metres of water depth (0.15 kg/cm² hydrostatic pressure at the bottom).
Poor waterproofing application. The single biggest cause of pool waterproofing failure in India is inadequate surface preparation. Pool shells are often cast with smooth formwork that leaves a glossy, low-adhesion surface. If the waterproofing membrane is applied without proper surface preparation — grinding, acid etching, or shot blasting — it will not bond. Within a few months, the membrane blisters and debonds, and water finds its way behind it.
Tile failure. Many pool builders rely on the tile grout as the primary waterproofing layer. This never works. Tile grout is cement-based and inherently porous. It cracks under movement and is attacked by pool chemicals. Once water penetrates through the grout, it travels behind the tiles, causing them to debond and fall off. The waterproofing must be a continuous membrane beneath the tiles, not the tiles themselves.
Pipe penetration failures. Every pool has penetrations — the skimmer, return inlets, drains, lights, and overflow pipes. Each penetration is a potential leak path. If the waterproofing is not properly detailed around these penetrations with collars, flanges, and flexible sealants, water will track along the pipe and leak through the concrete shell.
Waterproofing Systems for Pools
Several waterproofing systems are used for swimming pools in India, each with its own advantages and limitations. The choice depends on the pool type (new or retrofit), the structural condition, the budget, and the tile finish.
Cementitious waterproofing coatings are the most economical option. These are polymer-modified cement powders mixed with water and applied in two or three coats by brush or spray. They form a rigid, crystalline barrier that bonds chemically to the concrete. Cementitious coatings are best suited for new pool shells that are structurally sound and unlikely to crack. They cost Rs 50 to Rs 90 per square foot and provide adequate protection for residential pools in moderate climates. However, they have limited flexibility — if the concrete cracks beyond 0.3 mm, the coating will crack too.
Liquid polyurethane membranes are the premium choice for pool waterproofing. These are two-component PU resins that are applied by roller or spray to form a seamless, flexible membrane. They remain elastic at temperatures from -20°C to 80°C and can bridge cracks up to 1 mm. PU membranes provide excellent adhesion to concrete, are resistant to pool chemicals (chlorine, bromine, pH adjusters), and can be trafficked within 24 hours. The cost ranges from Rs 120 to Rs 200 per square foot depending on the dry film thickness specified (typically 1.5 mm to 2 mm). For commercial pools, municipal pools, and high-end residential pools, liquid PU is the system I recommend most often.
Crystalline waterproofing systems are added to the concrete mix or applied as a surface treatment. They contain reactive chemicals that penetrate the concrete pores and form insoluble crystalline deposits that block water ingress. Crystalline systems are excellent for new pool shells because they become part of the concrete itself — they cannot be damaged by tile installation or pool cleaning. They are also self-healing to some degree: if a new crack forms, the crystalline chemicals react with water to form new crystals that seal the crack. However, crystalline systems require proper concrete curing and are less effective on old, carbonated concrete. The cost is Rs 60 to Rs 100 per square foot for surface-applied systems.
Sheet membranes — PVC, HDPE, or EPDM — are used in large commercial and municipal pools where the pool shell is cast in segments with construction joints. These membranes are bonded to the substrate with adhesive and heat-welded at the seams to create a continuous barrier. Sheet membranes offer high robustness and chemical resistance but require skilled installation and careful detailing at penetrations. They are rarely used in residential pools due to the higher cost and complexity.
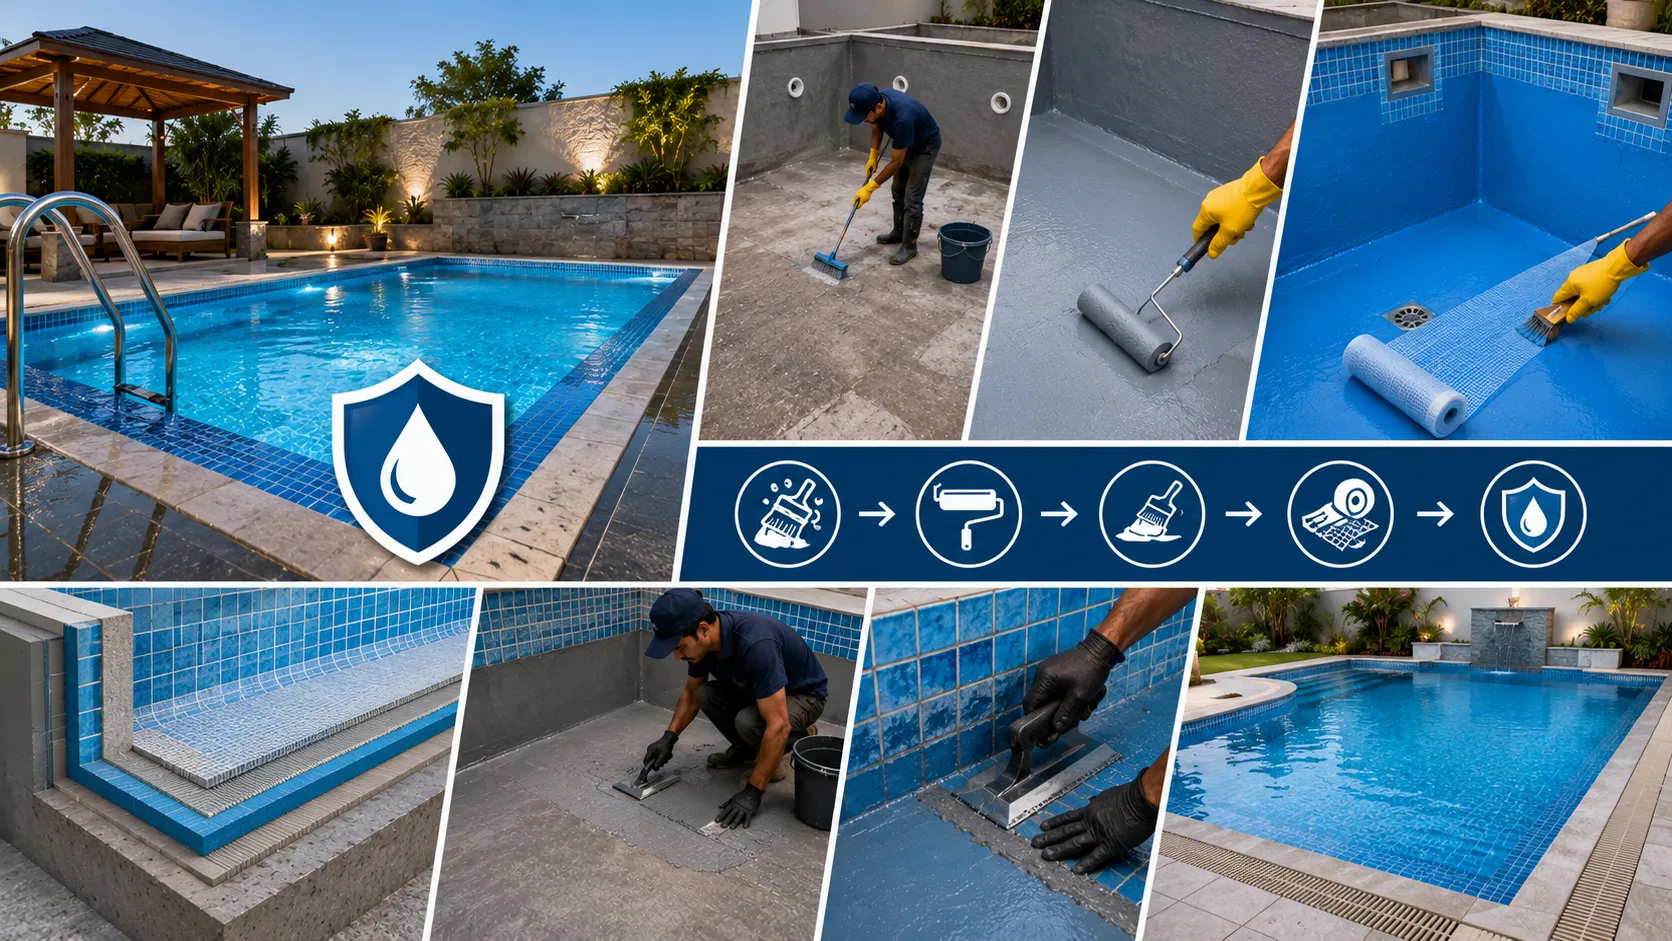
Step-by-Step Waterproofing Process
A proper pool waterproofing installation follows a strict sequence. Skipping any step risks the entire system:
1. Substrate preparation. The concrete shell must be cured for at least 14 days (28 days preferred). All formwork oils, curing compounds, and laitance must be removed. The surface should be shot-blasted or ground to achieve a concrete surface profile (CSP) of 3 to 5 — rough enough for the membrane to achieve mechanical adhesion. All cracks wider than 0.3 mm must be chased out and repaired with a flexible epoxy or PU injection mortar.
2. Corner fillets. All internal corners — where the floor meets the wall, where walls meet — must be filleted with a cementitious or epoxy mortar to create a smooth radius of at least 25 mm. Sharp corners cause stress concentration in the membrane, leading to tearing.
3. Priming. Apply the primer specified by the membrane manufacturer. For PU membranes, a moisture-tolerant epoxy primer is typically used. Allow the primer to cure fully — usually 4 to 24 hours depending on temperature and humidity.
4. Membrane application. Apply the liquid PU membrane in two coats with a medium-pile roller. The first coat should be applied at 0.8 mm to 1 mm dry film thickness. Allow it to cure until tack-free (typically 6 to 12 hours at 30°C). Apply the second coat at right angles to the first to ensure uniform coverage. The total dry film thickness should be at least 1.5 mm for residential pools and 2 mm for commercial pools. Use a wet film thickness gauge to verify coverage during application.
5. Reinforcement at critical areas. At corners, pipe penetrations, and construction joints, embed a non-woven polyester reinforcement fabric into the first coat of the membrane. This adds tensile strength at these high-stress locations. The fabric should extend 100 mm on each side of the joint or penetration.
6. Flood testing. After the membrane has fully cured (minimum 72 hours at 30°C), fill the pool with 150 mm to 300 mm of water and mark the water level. Monitor for 48 hours. If no water level drop is observed, the membrane is watertight. If the level drops, locate the leak, repair the membrane, and retest before proceeding to tiling.
7. Protection layer. Before tiling, apply a cementitious protective layer over the membrane to prevent mechanical damage during tile installation. This is especially important for PU membranes, which can be punctured by sharp tile edges or dropped tools.
Tile Fixing Over Waterproofing
The tile adhesive used over pool waterproofing must be compatible with both the membrane and the tile. Standard cement-based tile adhesives are usually suitable over crystalline and cementitious waterproofing, but over PU and sheet membranes, a flexible polymer-modified tile adhesive is required. The adhesive must also be resistant to water immersion — not all "waterproof" tile adhesives are suitable for permanent immersion in chlorinated water. Look for products labelled as "pool-grade" or "immersion-resistant" tile adhesive.
Tile grout for pools should be epoxy-based, not cement-based. Cementitious grout is porous, stains easily from pool chemicals, and cracks under movement. Epoxy grout is impermeable, chemically resistant, and has higher flexural strength. The extra cost — about Rs 80 to Rs 120 per square foot for epoxy grout versus Rs 15 to Rs 30 for cement grout — is money well spent. A pool with cement grout will need regrouting every 2 to 3 years; epoxy grout lasts the life of the tile installation.
Movement joints must be carried through the tile layer. A PU sealant should be installed at the tile surface level to match the movement joint in the substrate. Do not simply grout over the movement joint — the tile will crack at that location within the first season.
Expansion Joints in Pools
Swimming pools experience significant thermal movement. A pool in Delhi that is filled with cold groundwater at 15°C in winter and heated to 30°C in summer — or simply exposed to 45°C ambient air temperature — will expand and contract by several millimetres across its length. If this movement is not accommodated by joints, the concrete shell and tile finish will crack.
For pools longer than 15 metres, a full expansion joint should be provided across the pool width, continuing through the concrete shell, the waterproofing membrane, and the tile finish. The joint should be 20 mm to 30 mm wide and sealed with a low-modulus PU sealant at the waterproofing level and again at the tile level. A PVC or rubber waterstop should be cast into the joint at mid-depth of the concrete shell. In smaller pools, movement joints at the perimeter — between the pool shell and the coping or deck — are usually sufficient.
I consulted on a 25-metre commercial pool in Noida where the engineer had omitted expansion joints entirely, arguing that the reinforced concrete would not crack. By the end of the first year, a 2 mm wide crack had opened across the full width of the pool floor, and the waterproofing membrane had torn. The repair cost over Rs 5 lakhs — far more than the joint would have cost during construction.
Water Chemistry Considerations
The chemicals used to treat pool water — chlorine, bromine, pH adjusters, algaecides, and clarifiers — are aggressive towards many construction materials. PU waterproofing membranes are generally resistant to pool chemicals, but some low-quality PU products can degrade over time when exposed to high chlorine levels. Always verify that the specified membrane has been tested for chemical resistance per ASTM C1305 or equivalent standards.
The pH of pool water should be maintained between 7.2 and 7.6. Water that is too acidic (low pH) will attack cement-based materials including the concrete shell and cementitious waterproofing. Water that is too alkaline (high pH) can cause scaling and reduce the effectiveness of chlorine. For pools with cementitious waterproofing systems, pH control is particularly important because the coating is essentially a modified cement layer that is vulnerable to acid attack.
Saltwater pools (those using salt chlorinators) are more aggressive than traditional chlorine pools because the saltwater environment accelerates corrosion of embedded steel and can cause osmotic blistering in some membrane systems. If you are building a saltwater pool, specify a membrane that is explicitly rated for saltwater exposure, such as a high-density PU or a sheet membrane system.
Cost of Pool Waterproofing in India
The total cost of a pool waterproofing system depends on the system type, the pool size, and the complexity of detailing. Here are realistic figures for the Indian market:
Cementitious waterproofing (two-coat): Rs 50 to Rs 90 per sq ft. Crystalline waterproofing (surface applied): Rs 60 to Rs 100 per sq ft. Liquid PU membrane (1.5 mm DFT): Rs 120 to Rs 180 per sq ft. Liquid PU membrane (2.0 mm DFT): Rs 150 to Rs 220 per sq ft. Sheet membrane (PVC/HDPE installed): Rs 200 to Rs 350 per sq ft.
For a typical 30 ft x 15 ft residential pool with 900 sq ft of surface area, a liquid PU system at 1.5 mm thickness will cost roughly Rs 1.1 to 1.6 lakhs for the waterproofing alone. Including tile adhesive, epoxy grout, and expansion joint detailing, the total waterproofing and tiling package typically ranges from Rs 3 to 5 lakhs. Compare this to the cost of repairing a leaking pool — which can easily exceed Rs 2 lakhs for a simple leak location and repair — and the value of doing it right the first time becomes obvious.