If you have noticed chunks of concrete falling off your building's slab, beam, or column, or if the ceiling in your home has started flaking and you can see rusted reinforcement bars underneath, you are dealing with concrete spalling. It looks alarming, and honestly, it should not be ignored. Spalling is a sign that the concrete is deteriorating, and if left untreated, it compromises the structural integrity of the building.
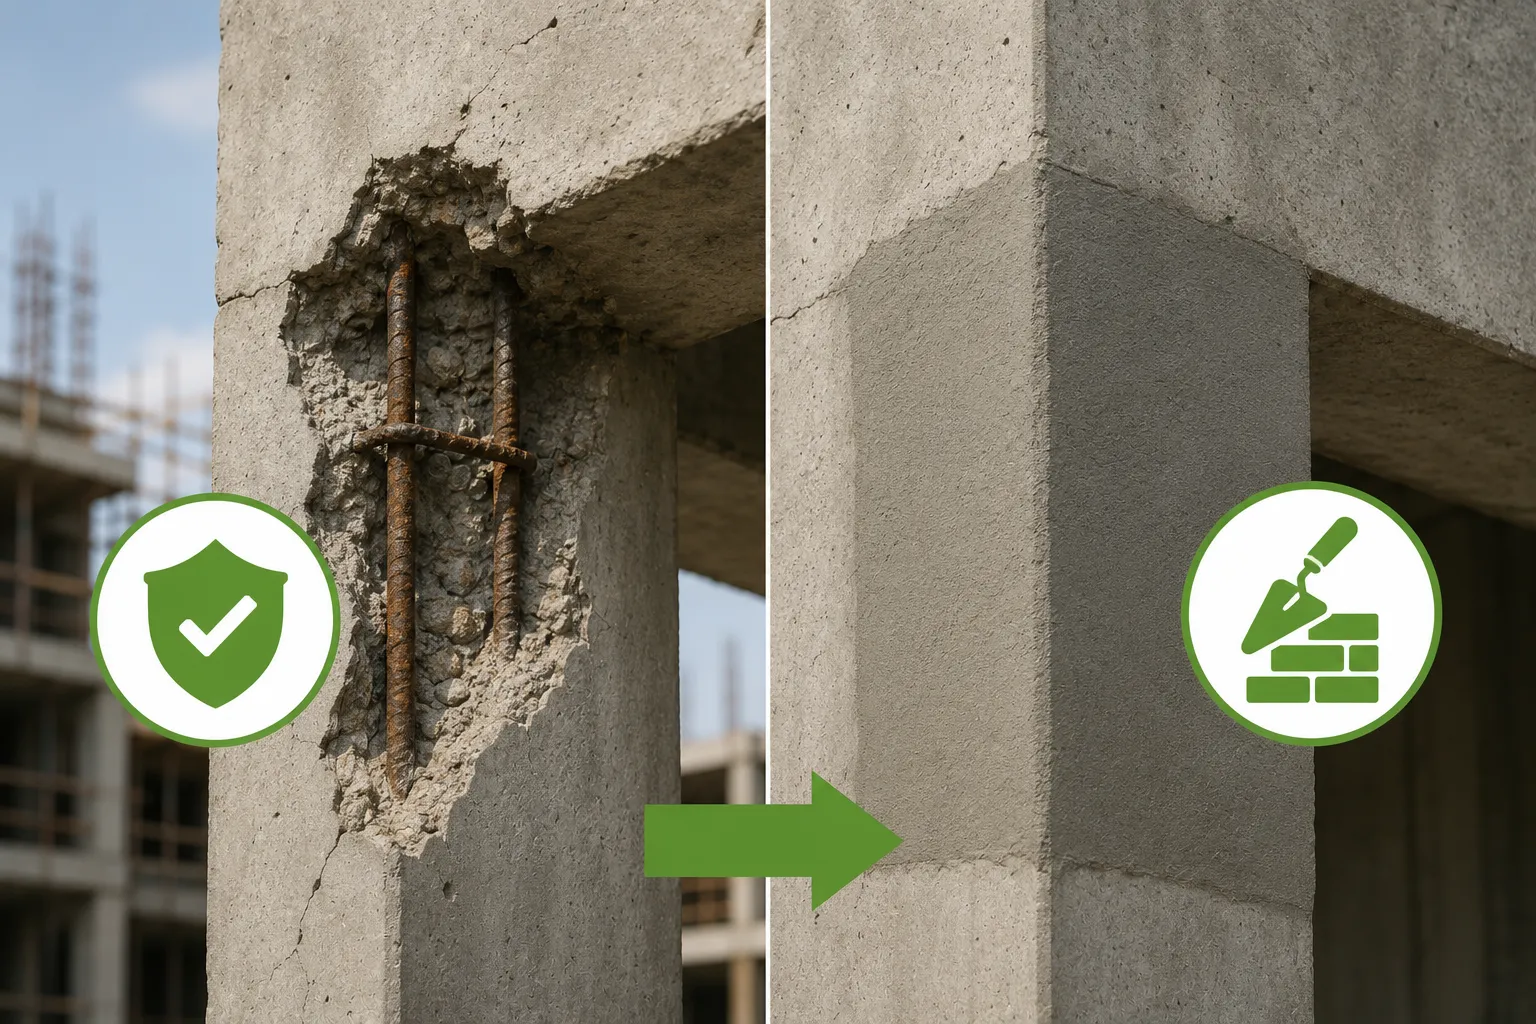
The term "spalling" refers to the breaking or chipping of concrete surfaces, often in layers or flakes. In more severe cases, large sections of concrete cover detach entirely, exposing the steel reinforcement to further corrosion. In Indian buildings, spalling is incredibly common — especially in structures that are 15 to 20 years old or those built near coastal areas. The combination of high humidity, inadequate concrete cover, poor construction practices, and lack of maintenance creates the perfect environment for spalling to develop.
What Causes Concrete Spalling?
Understanding why spalling happens is the first step toward fixing it correctly. The most common cause in India is corrosion of steel reinforcement. Steel reinforcement bars (rebar) inside concrete are protected by the alkaline environment of concrete, which forms a passive oxide layer on the steel surface. But when carbon dioxide from the air or chloride ions from saltwater penetrate the concrete, they reduce the alkalinity and break down this protective layer. Once the steel starts rusting, the rust occupies more volume than the original steel — up to six times more. This expansion creates internal pressure that cracks and pushes the concrete cover outward, causing it to spall off.
Other causes include freeze-thaw cycles (relevant in Himalayan regions), fire damage that spalls concrete explosively, alkali-aggregate reaction (a chemical reaction between certain aggregates and cement alkalis), poor construction quality with inadequate cover thickness, and mechanical damage from impact or overloading. In many older Indian buildings, the most common scenario is carbonation-induced corrosion. The concrete cover is too thin (often 15 mm or less when it should be 25–40 mm depending on exposure), and over 15–20 years, carbonation reaches the reinforcement depth. Then rusting begins, and spalling follows.
Assessing the Severity of Spalling
Not all spalling requires the same repair approach. For minor surface spalling where the reinforcement is not exposed, a simple repair mortar application may suffice. For moderate spalling where the reinforcement is exposed but not severely corroded, you need to clean the steel, apply a corrosion inhibitor, and rebuild the section with repair mortar. For severe spalling with significant section loss in the reinforcement or the concrete member, structural strengthening may be required using carbon fibre wrapping or steel plate bonding.
A good first step is to tap the affected area with a hammer. Sound concrete produces a ringing sound. Delaminated concrete produces a hollow drum sound. Mark all hollow-sounding areas — they need to be removed and repaired. If you see heavy rust on exposed rebar with more than 15–20% section loss, consult a structural engineer before proceeding with repairs.
Step-by-Step Concrete Spalling Repair Process
The repair process for concrete spalling follows a well-established sequence. Cutting corners at any step will result in the repair failing within a year or two.
Step 1: Remove All Loose Concrete
Use a hammer and chisel or a light chipping hammer to remove all loose, delaminated, and spalled concrete around the affected area. Chip back until you reach sound concrete where the substrate is firm. The edges of the repair area should be undercut — cut at an angle so the repair mortar keys into the existing concrete. This prevents the repair patch from popping out later. Continue chipping until you have exposed at least 20 mm of clean reinforcement bar all around the corroded section.
Step 2: Clean the Reinforcement
The exposed steel reinforcement must be cleaned of all rust. Use a wire brush, sandpaper, or a light abrasive blaster to remove loose rust and scale. The goal is to achieve a bright metal surface, not necessarily mirror-finish, but free of flaking rust. For heavily corroded bars, a rust converter may be applied after mechanical cleaning. If the reinforcement has lost more than 20% of its cross-section, additional rebar should be welded or tied alongside the existing bar to restore strength — this should be done on the advice of a structural engineer.
Step 3: Apply Corrosion Inhibitor
Once the steel is clean, apply a coat of zinc-rich epoxy primer or a corrosion-inhibiting coating to the exposed reinforcement. This creates a barrier that delays the onset of further corrosion. Allow the coating to dry as per the manufacturer's instructions. This step is often skipped by cost-cutting contractors, but it is critical for the longevity of the repair.
Step 4: Apply Bonding Agent
Before applying the repair mortar, coat the prepared concrete surface with a bonding agent — either a polymer emulsion or an epoxy bonding bridge. This ensures that the repair mortar adheres strongly to the old concrete. Apply it with a brush, making sure to cover all exposed surfaces. Apply the repair mortar while the bonding agent is still tacky (wet-on-wet application).
Step 5: Apply Repair Mortar
Use a polymer-modified cementitious repair mortar designed for structural concrete repair. These mortars are pre-blended, require only the addition of clean water, and provide high bond strength, low shrinkage, and good durability. For horizontal surfaces like slabs, you can trowel the mortar on. For vertical surfaces like beams and columns, use a formwork approach or build up the mortar in thin layers (each layer not exceeding 25 mm thickness) to prevent slumping. Compact the mortar well to eliminate air pockets. Finish the surface to match the surrounding concrete texture.
Step 6: Cure the Repair
Curing is essential for cementitious repair mortars. Keep the repaired area damp for at least 7 days by covering it with wet burlap or applying a curing compound. Proper curing ensures the repair mortar gains its full strength and bonds properly with the substrate. Rushed curing is a common cause of premature repair failure.
Step 7: Apply Protective Coating
Once the repair is fully cured, apply a protective coating over the entire area — and ideally over the entire structural member. This could be an anti-carbonation coating, a waterproofing paint, or a clear sealer depending on the exposure conditions. For external beams and columns exposed to rain, an elastomeric waterproofing coating provides the best long-term protection. For interior repairs, a simple acrylic sealer may suffice.
Preventing Spalling in New Construction
Prevention is always cheaper than repair. In new construction, ensure adequate concrete cover over reinforcement as specified in IS 456: 2000. For moderate exposure conditions, the minimum cover is 25 mm for slabs and 40 mm for beams and columns. For severe exposure like coastal areas, increase the cover by 5–10 mm and use higher-grade concrete (M30 or above). Use good quality concrete with proper compaction and curing — honeycombing and poor compaction are direct invitations to spalling. Apply waterproofing to exposed roof slabs and terrace areas to prevent water from reaching the reinforcement. And consider using corrosion-inhibiting admixtures in the concrete mix for structures in aggressive environments.
When to Call a Professional
Small patches of spalling on a slab soffit can be repaired by a skilled homeowner or a local contractor. But if you see widespread spalling across multiple structural members, heavy corrosion with significant section loss, or if the building is in a coastal area, bring in a professional. Sterling Technotrade offers both concrete repair products and professional concrete repair services across India. Our trained applicators follow the correct repair sequence and use quality materials to ensure lasting results.
Conclusion
Concrete spalling is not something that fixes itself. It is a progressive problem that gets worse with each monsoon season. The good news is that it is entirely repairable when the correct process is followed. Remove the damaged concrete, clean and protect the reinforcement, rebuild the section with a quality repair mortar, and protect the surface with a suitable coating. Do it right, and the repair will outlast the original structure. Do it cheap, and you will be fixing it again in two years.
If you have spalling concrete in your building and are unsure how to proceed, contact our technical team at Sterling Technotrade. We will help you assess the damage and recommend the right repair approach and materials.